Most of us would like to do widefield CCD imaging of large nebulas or galactic fields but are limited by the small size of our CCD chips. This is a situation shared by most astroimagers. Affordable CCD chips are in general one fourth to one third the size of 35mm film.The CCD imager desiring wider fields has three choices: buy a larger more expensive chip, decrease the focal length of the imaging system, or use the technique of creating mosaics.
Making mosaics is an old technique used back in the 70's and 80's to splice together images sent to us by the space probes of those days. Today, mosaics offer the amateur astroimager an easily available and affordable method of capturing a wide region of sky by piecing together several smaller images to make a larger one. There are many software packages available today that are capable of creating mosaics. The authors have used Adobe Photoshop successfully to piece together mosaics in addition to performing many other image processing applications. Photoshop is an outstanding program familiar to most astroimagers. Creating mosaics need not be an intimidating process. In our experience many program manuals do not fully explain how to use some of their complex features. The object of this article is to take readers step by step through the mosaic process using Photoshop. We will explain many of the nuances and pitfalls you need to know in order to make a successful mosaic. In this way we hope to shorten the learning curve.
Mosaics can be done using instruments of variable focal length but it does help to begin with a sizable field of view. Short focal length refractors are ideal instruments for creating widefield mosaics. The images provided by the authors were taken with a 4" takahashi refractor and ST8 CCD camera (SBIG).
An attractive feature of mosaics is conservation of resolution. For a given CCD chip, a shorter focal length will result in a dropoff in resolution as each pixel covers a larger area of sky. Creating a mosaic conserves the resolution by maintaining a longer focal length. Also due to the increased number of pixels the larger file sizes of mosaics generally give higher quality prints, sometimes up to poster size.
Mosaics can be made with any number of images, but to keep things simple we will discuss the creation of a mosaic from four individual images. Proper planning is critical in the pursuit of a successful mosaic. Individual frames need to be overlapped slightly. In other words each frame needs to have a common reference point, usually a bright star that will be present in the corner of each image. It is desirable to overlap only slightly to match up the frames but not too much so as to maximize the effective field size. Exposure values need to be consistent for all images. Different exposure times will make it difficult to match contrast and brightness of each frame later on. Also the camera should not be rotated between frames.
Once the images are taken they should be individually calibrated (darkframe and flatfield). Defects should be removed and unwanted edges should be cropped out. The image should then be converted to a format usable by the image processing software. In our case we converted the images into 8 bit tiff format for use in Photoshop. Labeling each image with a code to identify the subject and position of each sector will assist in the later construction of the mosaic, especially if the number of layers increases beyond four. For example an image of M31 upper left corner would be labeled M31UL. Do not make major contrast and brightness adjustments at this point although log scaling can be done if it is applied equally to all images. In our example, a four image mosaic of M31, the core of the galaxy served as the central common reference point.
Step 1
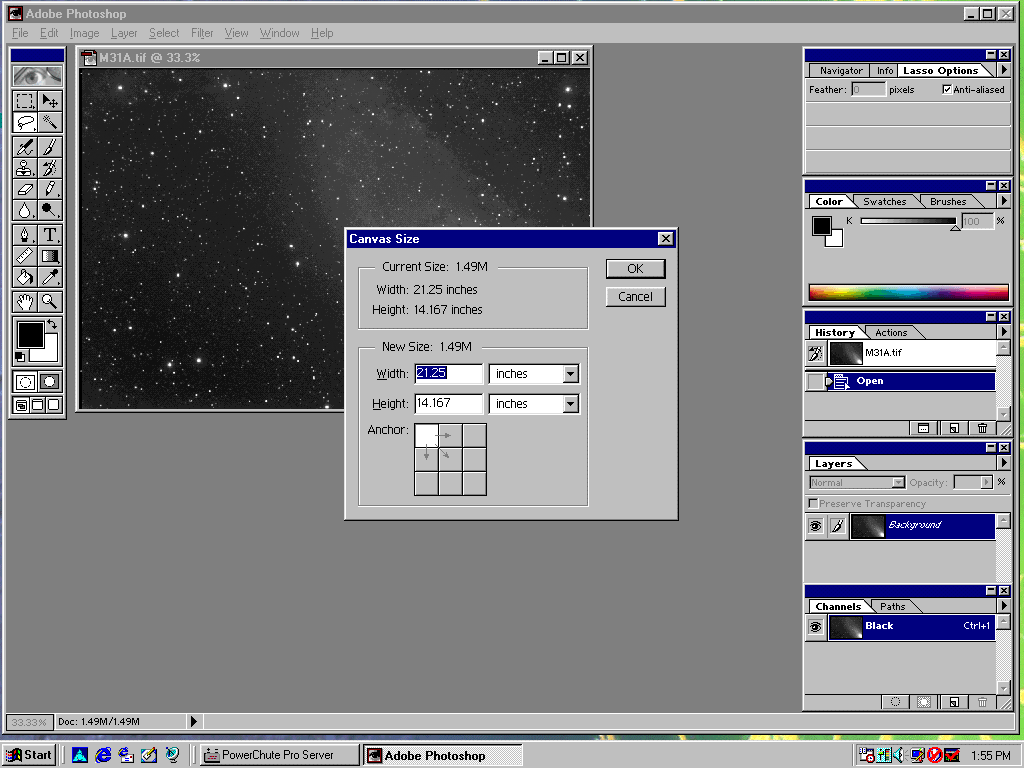
Open the first image and expand the canvas size to an approximate dimension that will allow the mosaic to fit on it. On the menu click "image" and then "canvas size". Enter appropriate dimensions for with and height. Make sure the anchor point is clicked on to place the image in its appropriate position on the canvas (see fig. 1)
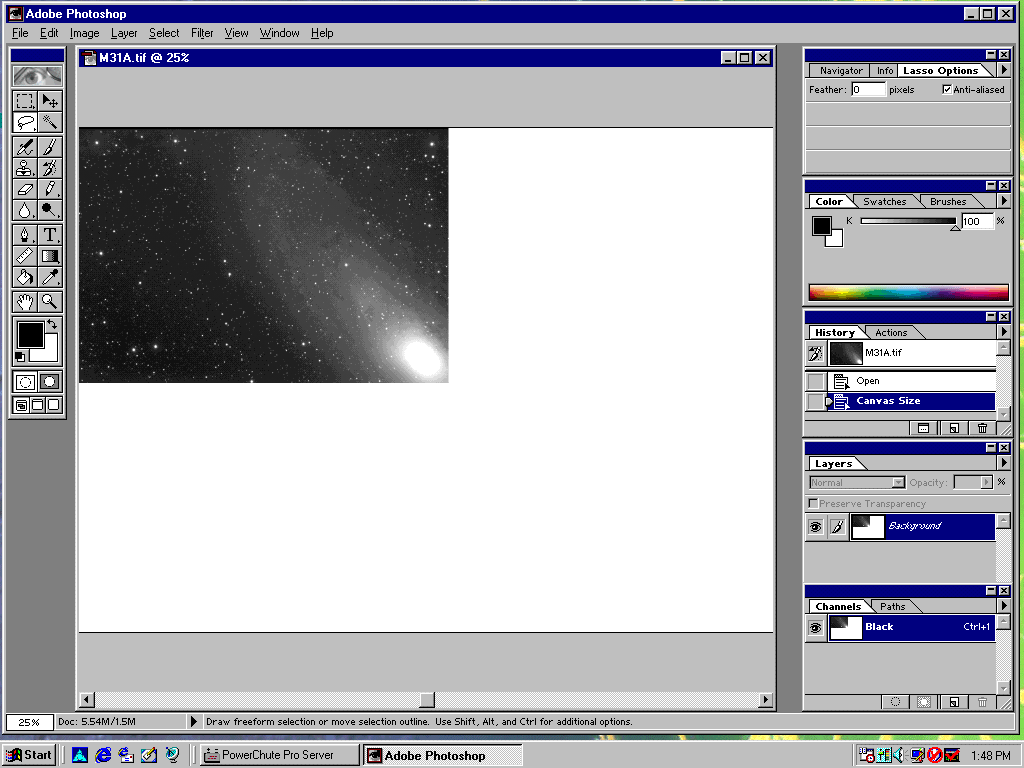
You can zoom out to show the entire canvas by holding "Ctrl" and "-" to shrink the image.(see fig 2)
Step 2
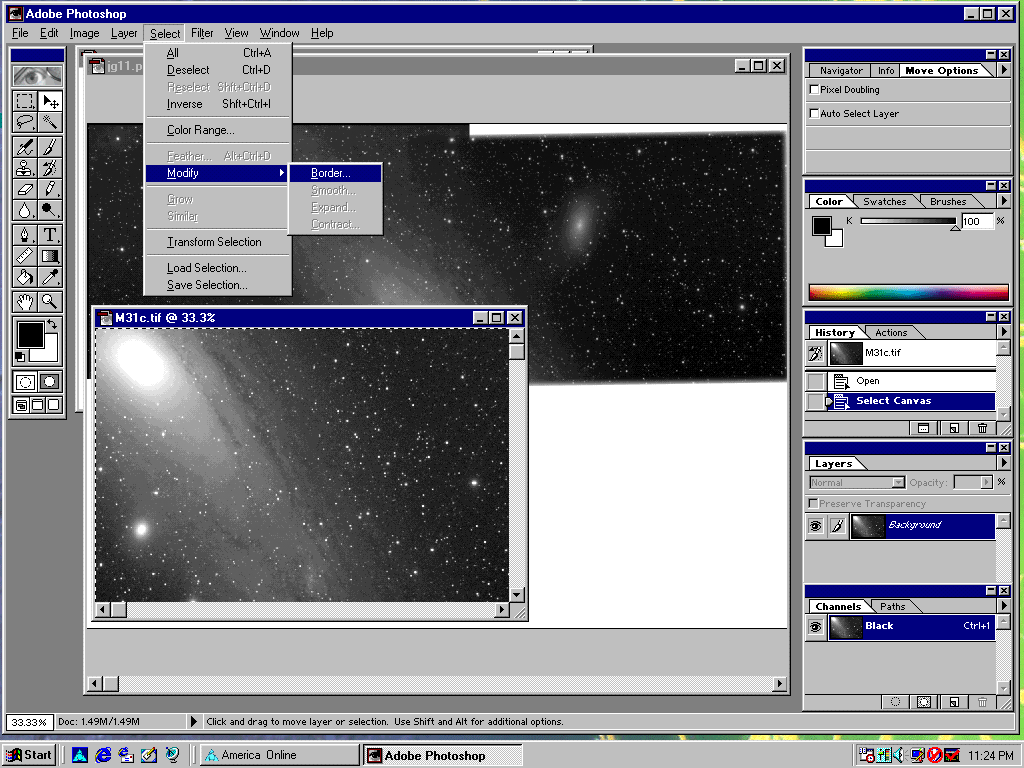
Then open the next image. On the control panel click "select" and then "all". The next step is an optional one but will assist in blending the seams imperceptibly together. Under the select menu click on "modify" and add a border of 5 pixels and then "feather" (also under select menu) the same number of pixels. (see fig 3)
Step 3
Invert the selection and under edit menu click on "cut". This will store the second image in the paste queue. Close the second image now and paste the stored image on the canvas. You now have your second layer to work with. Reduce the second layer opacity to about 50% and align the two layers by precisely superimposing the common stars. The easiest way to align the two layers is to right click on the layer and then choose "free transform" . Large movements are accomplished by dragging. Fine movements are accomplished (single pixel steps) by using the arrow keys. Often some rotational correction is necessary (if you were not precisely polar aligned) especially with the last image taken at the telescope. This is accomplished by right clicking the layer and choosing rotate. You can also change the center of rotation by dragging the center icon to the desired center point. Do not adjust brightness and contrast until all the images are merged. When the two images are merged to your satisfaction press "enter" and don't forget to restore the opacity to 100%. Repeat this process for all the other images.
Step 4
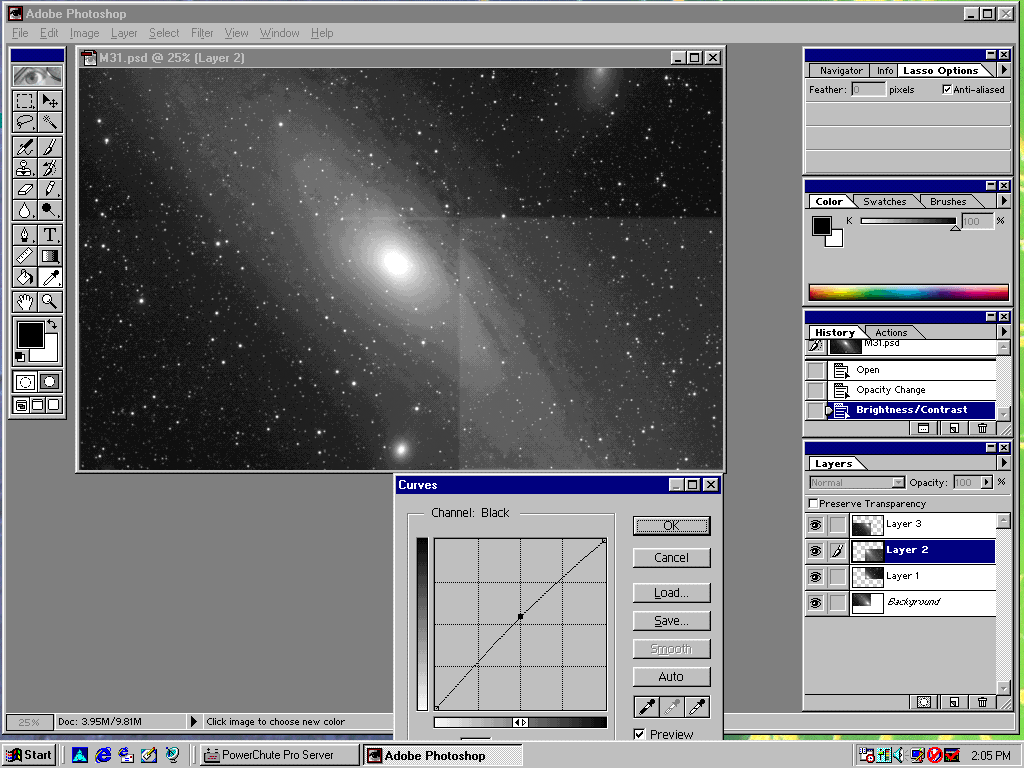
This next step is a critical one. It is desirable to make the seams between the images imperceptible by matching the contrast and brightness of each image to the next image. For each image layer go to "image" and then "adjust". We found that by alternating between "brightness and contrast" and "curves" the seams could be made invisible. You should go in order, either clockwise or counterclockwise from one image to the next adjacent one until all the images are matched and the seams are gone. This step is difficult, requiring practice and patience.(see fig.4)
Step5
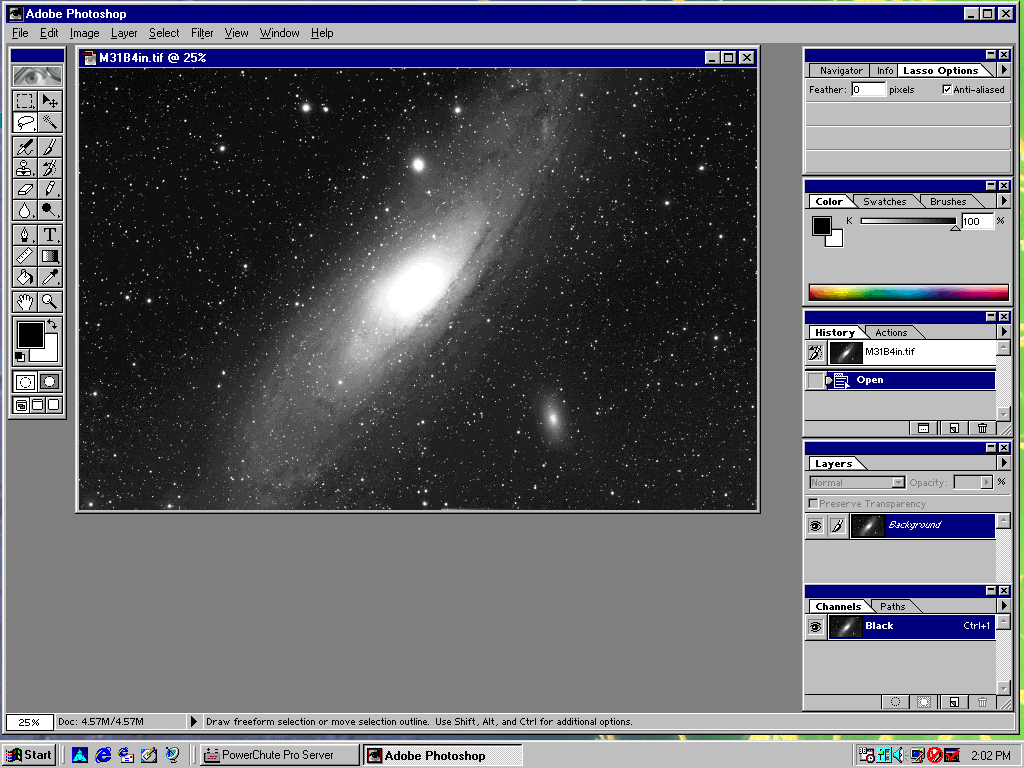
In order to work with the mosiac as a single image you need to "flatten" the image (by selecting "flatten image" under the layer menu). Before flattening the image you need to save the image as a Photoshop document. This will allow you to work with the individual layers in the future which cannot be done with the flattened image. Once the image is flattened it becomes a single image.(see fig. 5)
Step 6
The last step is to crop the image and continue processing it as a single image. In order to save it in a different format you may need to use "save a copy".
Summary
1) Open the first image and creat the canvas
2) Open the next image, cut and paste onto the canvas.
3) Merge the images (decrease opacity to 50%) then "free transform" then "drag and arrow keys" (may need to rotate), then "enter", restore opacity to 100%.
4) Repeat for all images.
5) Using "brightness and contrast" and "curves" create imperceptible seams.
6) Save as a Photoshop document before "flattening" the image.
7) Crop and process as one image.
Adobe Photoshop is one of the most versatile and well received programs for processing astroimages. We are currently using the most recently released version 5.0. The package is somewhat expensive, but it is very inclusive and well worth the price. Often an older version may be purchased at a local computer show for a fraction of the cost. If you own another company's graphic product, Adobe may offer you a competitive upgrade purchase price to buy their product which could translate to hundreds of dollars saved.
Creating mosaics is an easy and affordable way to expand your astroimaging repertoire without the hassle of purchasing new equipment. It is our hope that this article will give you the skills to successfully perform and enjoy the process of making mosaics.