Early in my astroimaging career I came upon the art of creating mosaics as a way around the small size of CCD chips. Joel Gelber and I described our photoshop technique of creating simple (4 frames or less) monochrome mosaics using photoshop (see S&T June,1999). As my imaging experience grew I began to make mosaics of color images and then complex multiimage composites incorporating frames made with several telescopes having very different focal lengths. My early attempts were simple mosaics imaged at short focal lengths using small refractors to capture the generous field of view of these larger objects. I was rewarded with CCD images having "film-like" field of views and file sizes that could support large format printing. Although promising, the images were limited by their small "image scale" and lower resolution as a result of the shorter focal lengths used. I then began to consider the possibility of mosaic projects imaged at much longer focal lengths with the ultimate goal being high resolution mosaics encompassing the entire field of the more spectacular large deep sky objects. I was inspired by the great B&W image of the Andromeda Galaxy taken with the world's largest Schmidt camera: the 1.34 meter Tautenberg camera (see Vehrenberg: Atlas of Deep Sky Splendors). This image had the best of both worlds in my opinion; large image scale and large field size. It occured to me that the focal length of this amazing image was similar to the focal length I use routinely to do long focal length imaging of small objects (12.5" F9 Cassegrain, FL = 2900mm). The possibility of high resolution, large field mosaics was intriguing but also daunting for the amount of work required would be enormous. With the proper planning and techniques I discovered it was indeed possible to complete these ambitious imaging projects and create remarkable world class images and spectacular prints. This article will describe the planning, techniques, and exciting results one can expect.
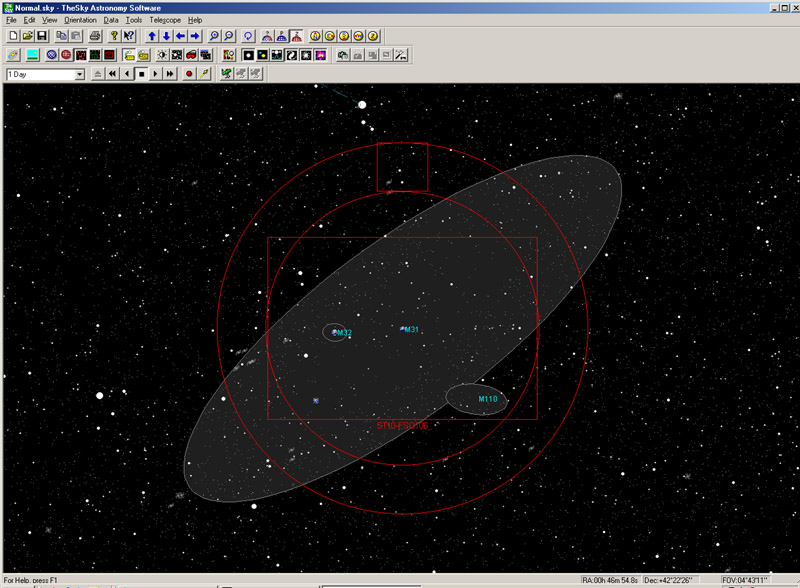
Planning is the most important part of the mosaic process. I construct a chart with an image of the object and a template of the FOV (field of view) of my imaging system drawn to scale (figure 2). "The Sky" software can also be used to help plan the mosaic project by creating a template of the FOV of the imaging system and superimposing it on the target object (figure 1). I can then determine how many separate frames are necessary keeping in mind an appropriate amount of overlap between images. It is best to start at the center of an object and then work "outward" as you add more frames.
The next step in the planning is to determine the desired exposure time for each frame. Regions of the object that are bright and/or have more detail can be imaged at longer focal lengths (and slower f-ratios) and with less exposure time to maximize resolution and efficiency. Dim regions may require more exposure time at faster f-ratios.
|
|
|
I have utilized several different methods for constructing a multiimage color mosaic. First, one has to decide whether to use LRGB or pure RGB technique. LRGB (see S&T July 2001) is a better choice for dim objects or objects with extended faint regions. LRGB mosaics can be made using 2 different methods. One method (which I call the LRGB "after" method) is to first stitch together the greyscale image. The RGB data (which can be a lower resolution color image) and the greyscale mosaic can be registered (using "Registar") and a final LRGB is then composited (ie: M31 and Rosette in figure 3). Alternatively one can make LRGB composites for each frame and then stitch the individual LRGB frames together (LRGB "before" method ie; M42 in figure 3). With very bright and colorful objects a pure RGB mosaic may be preferred.
Another type of mosaic image is what I call the "composite" image. This type of image incorporates several images taken with two or more telescopes utilizing different focal lengths. It could be a single widefield low resolution frame with a higher resolution component taken at a much longer focal length layered onto the lower resolution background. There are many variations of this method which incorporate both mosaic and layering techniques (ie: Cone Nebula Region in figure 3). The primary purpose of the composite image is to utilize component images taken at different focal lengths in order to deliver the maximum resolution where it is needed in the image. The possibilities are limitless.
The basic techniques for stitching mosaics in photoshop was covered in my original article (see S&T June, 1999) and my web site (http://www.robgendlerastropics.com/Article3.html). I will not review the basic photoshop techniques but instead will focus on the more challenging problems and advanced techniques needed to complete a complex multiimage color mosaic. The most challenging problem of stitching a seamless color mosaic is to match the color of the adjacent frames. Even if one is imaging from a dark site there may be difficulties in matching the color due to exposures being taken of the object at different altitudes in the sky. Imaging from light polluted locations introduces even greater obstacles due to color gradients. Precautions can be taken to minimize some of these issues. At lower altitudes the blue channel suffers from extinction and therefore should be taken with the object close to the zenith. The green channel is most vulnerable to the effects of light pollution and subsequent gradients so it should be taken in the area of the sky furthest from the skyglow. The red channel is relatively immune to skyglow and atmospheric extinction and is therefore more resilent. Before the RGB for a single frame is combined every attempt should be made to eliminate color gradients. Color gradients are the greatest obstacle to making successful color mosaics. Fortunately there are very good methods available to remove gradients. A brief desciption of my method of gradient removal can be found in figure 4.
Regardless of which mosaic technique is used certain basic processing steps should be applied to all frames including greyscale and color images prior to stitching. Aside from basic calibration, processing algorithms such as deconvolution, DDP, and nonlinear stretching (curves) if used, should be applied to all images in 16 bit mode before saving the frame in 8 bit mode prior to stitching. Prior to stitching it is very useful to open all individual frames together on the computer screen in separate windows. The greyscale frames can then be matched in brightness and contrast and the color frames matched in balance and saturation prior to stitching. All color gradients should be removed as best as possible at this stage (figure 4). Appropriate preparation of the images prior to stitching will save much work and frustration later in the process. The mosaic is aligned and stitched together on the "canvas" employing the techniques previously described (see S&T Jume,1999).
Often frames will be rotated in reference to each other to some degree. Despite significant rotation, frames can be aligned precisely using the program "Registar" to register each frame to its adjacent one. If necessary one can use the "rotate" tool in Photoshop (right click on the frame in the "free transform mode" and you will find "rotate" in the menu). The frame can then be rotated by dragging gently on the corner of the frame. Using this technique the frames can then be precisely aligned.
If two adjacent frames differ markedly in color the best advice is to reprocess those frames from scratch being careful to eliminate color gradients. Minor differences in color tone can be adjusted by selecting the entire frame or the region in question with the lasso, feather an appropriate amount, and then use the "select color" adjustment (Figure 5). In this way subtle changes in color tones can be adjusted to match adjacent frames. Alternatively using "curves" applied to the different color channels or the "color balance" menu can be employed to adjust and color-match adjacent frames. The saturation tool may also be useful in matching "hue" and "saturation" for adjacent frames. It should be noted that a color mosaic can only be successful if the colors of the frames blend together perfectly. Color "fidelity" may need to be compromised to a small degree for the ultimate goal of "seamlessness".
When two frames have different brightness or
contrast, adjustments can be made using "curves"
to "bring up or down" the intensity or brightness of
one image relative to another. Sometimes a section of an image
may have excessive contrast requiring the contrast to be adjusted
down. I prefer to make adjustments for contrast using "curves"
by bringing up the "zero" point and bringing down the
midlevel (See figure 6). This will have the effect of "lowering"
the contrast and intensity and may also reduce the appearance
of noise in the frame. The "brightness and contrast"
menu can also be useful. If a frame needs a minor adjustment in
brightness either up or down I will add or subtract a few notches
in the brightness level until the frames blend perfectly. It should
be noted that often only part of a frame need be adjusted. This
is accomplished by using the "lasso" to select the region
to be adjusted. Make sure to feather the selection an appropriate
degree so the adjustment has a gradual margin.
An image with excessive noise can be adjusted "down" by using the "gaussian blur" tool or "median" tool.. These functions can be further adjusted by going to "edit" and then the "fade" function (under "edit") to fine tune the changes. A noise reduction program such as "Grain Surgery" can also be very useful for controlling noise in an image. Occasionally it may be useful to "add" noise to an image to match the overall "grain" of its neighbor. This can be accomplished using the "add noise" tool under "filters".
Once the individual frames are blended together to your satisfaction the image is "flattened". Be sure to save the photoshop document (unflattened image) before flattening. This will allow you to return at a later time to make further adjustments or add additional layers. The flattened image can be further processed in regards to intensity, color balance, saturation, sharpening, etc.
The end result and reward of the process described above is a high resolution image having a file size large enough to produce an outstanding large format print. In fact the detail present in these multiimage mosaics can only be appreciated in a large print often greater than 30 x 40". The web versions cannot reveal the full detail present in these types of images.
Complex mosaics and composite images can be difficult and time consuming projects. They can be achieved however with help from the 3 P's: patience, planning and practice. The reward of high resolution "world class" images and prints are indeed possible using the techniques described here. My hope is that this article will provide direction to those imagers wishing to attempt these ambitious projects.